Saturday, July 30, 2011

Cheesecake Muffins


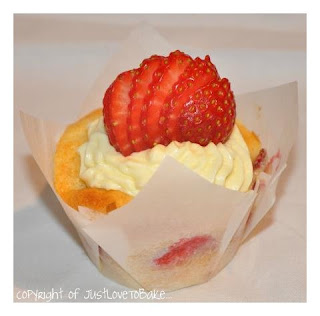
One recipe that makes (depending on what extras you add) ...Strawberry Cheesecake Muffins, Lemon Cheesecake Muffins, Raspberry & White Chocolate Cheesecake Muffins... Whatever flavour you can think up! Now you know why this is my most favourite Muffin recipe!


For the Muffin mix you will need...
125g unsalted butter, softened
250g cream cheese
330g caster sugar
4 eggs
1 tsp vanilla extract
300g self-raising flour, sifted
1 punnet of sliced strawberries, or zest of one lemon, or choc chips, Blueberries, Raspberries, jersey caramels, bananas, pie apple... use your imagination! 

Preheat the oven to 180c and line muffin pan with paper cases.

Place the butter, cream cheese and caster sugar in a bowl and beat with electric beaters until pale. Add eggs one at a time beating after each addition. Add the vanilla and then fold in the sifted flour. At this point mix in whatever flavourings you want being careful not to over mix.


Spoon into muffin cases and bake in the oven 20-30 mins or until golden. Cool before serving with cheesecake cream!
And for the cheesecake cream you will need:
    150g cream cheese
    1/3 cup icing sugar, sifted
    1/2 cup thickened cream
    1/2 tsp vanilla extract

    Strawberry and White Chocolate Cheesecake Muffin
    Strawberry Cheesecake Muffin
    Lemon Cheesecake Muffin


    Place all ingredients into a bowl and beat until thick and creamy! Refridgerate until ready to serve. Decorate as desired!


    Wednesday, July 20, 2011

    Super Mario Birthday Party!

    Well I have been home sick for a few days and today I finally have the energy to sit up and eat something. So to starve off the boredom I started looking at some awesome sites, one dedicated solely to partys. www.savethedate4cupcakes.com is an absolutely mind blowing website. I spent a good hour looking back through all the posts and my mind is spinning with ideas and possibilities for my daughters 3rd birthday... just for starters, LOL.
    Anyway my sons last birthday was his 6th and for a theme we decided on Super Mario. At first I wasn't so sure I could pull it off but once I started thinking about it, it became quite hard to stop! So this blog is dedicated to my Son's Mario Party!!


    Colourful Vanilla Cupcakes with homemade Mario flags and cupcake stand!


    Followed by homemade Mushroom cake pops!


    And homemade iced yellow stars...


    Now a picture of the food... mostly American/Italian style foods like pizzas, mini hotdogs, cheezles and gold coins to suit the Mario theme!


    Then the games comprised of good ole fashioned games such as ....
    Yoshi's Apple Bobbing!


    And a homemade "Pin the Nose" on Mario... (amazing what you can do with a A3 printer and some basic computer knowledge!)


    Of course we can't forget the cute pin the nose on the kids Photos...

    This turned into quite a good game on it's own!!
    And finally the send off is not complete without the very cool Mario Thank you bags!!!


    We really had such a great day and perhaps I set the bar a little too high in terms of future parties, but I just love a decent birthday bash. It is something my mother passed onto both my Sister and I... the knack of throwing a party with all the bells and whistles and a great cake to boot!

    Anyway I hope you have enjoyed this edition to my blog and perhaps have even been inspired!


    Saturday, July 16, 2011

    Sticky Date Pudding!


    So this weekend was beautifully cold and rainy... the perfect setting for some baking! Only problem is that my oven is broken! Yep, the heating element chose to die right before the weekend. But I am not to be stopped so I googled "baking without an oven" and researched until I came across a post about using my sunbeam electric frypan to cook cakes. Now this I had to try! Place a rack inside to elevate the cake and close the lid. As simple as that!


    So the following recipe can of course be baked in an oven but if you are without an oven you have to give this a go!
    Ingredients
    2 pears cored and sliced
    1 cup of pitted Dates
    1 1/4 cups of water
    1 tsp of bi-carb soda
    60g of butter cubed
    1 cup of tightly packed brown sugar
    2 eggs
    1 1/2 cups of SR Flour
    1 tsp of vanilla extract

    Place dates, water and bi-carb into a saucepan and bring to the boil. Boil for 5 mins. Then mash up with a fork.
    Stir in chopped butter and mix until it is melted.
    Stir in eggs, brown sugar and vanilla extract, then fold in flour til just combined
    Arrange Pears in the bottom of a greased lined spring-form cake pan. Pour batter on top.
    Place in electric frypan on number 8 for 50 mins or until cake is firm.
    Alternatively place in working oven at 180c for 35-40 mins.

    Stand in pan for 10mins to cool slightly before turning out!


    Now for the Sauce...

    1/2 cup of water
    2 cups of sugar
    2 cups of cream

    Place water and sugar in saucepan and bring to the boil, boiling until it reaches a golden colour. About 8-10mins. Try hard not to stir... and keep watching as it changes quite fast and you don't want to burn it!!
    Take off the heat then pour in 2 cups of cream, stir till no lumps. Be careful as the sugar syrup is extremely hot and will bubble when the cream is added, so use a long handled spoon and large saucepan! 
    Refridgerate left over sauce.


    Perfect for a cold winter's day or after a walk/bike ride on a freezing afternoon with great friends!

    Who says you need an oven to bake!


    Friday, July 8, 2011

    Date and Walnut Rolls...in a can!


    I found this interesting recipe recently and just had to try it! I had never heard of a "Nut Roll tin" or thought about using Juice Cans for baking but the results are professional, delicious and so simple to create.
    In my quest to find the correct tins I ended up buying two 850ml tins of Apricot nectar... which I froze the contents for making Apricot Chicken at a later date. Using a tin opener that cuts below the tin lip (magican or tupperware can opener) I opened the tins and emptied them. I then washed and dried the tins, before spraying them with oil and lining them with baking paper.


    The recipe Ingredients

    60grams of butter
    1 cup of boiling water
    1 cup of finely chopped dates
    1/2 teaspoon of bi-carb soda
    1 cup of firmly packed brown sugar
    2 cups of SR Flour
    1/2 cup of walnuts roughly chopped
    1 egg lightly beaten

    Pre-heat oven to 180c
    In a medium saucepan combine water and butter and cook stirring until butter melts. Take off heat. Add Dates and bi-carb and stir to combine. Then stir in sugar, SR Flour, egg and walnuts until combined.
    Spoon mixture into tins, should be just over half filled in each Can. Replace lid of can and place on a lined tray in the oven (the lining will catch the glue if it melts from the outside of tin).
    Bake for about 45 mins in fan forced oven or until a skewer comes out clean.
    Leave to cool for 5 mins in tin, then take the lid off and tip out your rolls.


    At this point I was holding my breath hoping this worked... and it did! And the taste was absolutely lovely. The whole family loved it! And they look like they could grace the pages of a cookbook!


    Don't you agree???

    Enjoy!

    Monday, July 4, 2011

    Bounty Cake


    This is a very simple cake that is reminicent of a Chocolate Bounty.

    Ingredients for cake

    1 cup of coconut
    1 cup of milk
    1 cup of SR Flour
    1 cup of white sugar

    Mix together, then pour into a greased cake or muffin pan.
    180c for 35 mins or 15 mins for muffins
    Should be able to pop a skewer into it and it should come out clean.
    Leave in pan to cool slightly then turn onto wire rack to cool completely.

    Ganache

    1/3 cup of cream
    180grams of Milk Chocolate

    Combine in microwave safe dish. Melt on high for about 1 min or until smooth, stirring every 30 seconds. Place in fridge until it has reached the right consistancy. Spread onto cake and enjoy!


    Choc Brownie Bites


    Felt like something quick and easy so baked these little beauties! Ready to eat in no time.

    Ingredients
    150g butter, chopped
    100g of milk choc
    100g of Dark choc
    Extra choc squares or chips
    1/2 cup of caster sugar
    1 cup of plain flour
    2 eggs lightly beaten

    Preheat oven to 180c
    Lightly grease muffin pan. Doesn't matter what size you use just adjust the time accordingly. I used patty case size pans.
    Place butter, milk and dark choc in saucepan over a medium-low heat. Cook, stirring, until melted and smooth. Stir in sugar.
    Take off heat and set aside for 5 mins to cool slightly.
    Whisk in flour and eggs. Spoon mixture into pan and either sprinkle with choc chips or place a square of choc onto each cake pushing in slightly. You could use up left over mini eggs including the caramel ones.
    Bake for 12- 15 mins or until top is firm.
    Cool slightly in pan before turning out to cool on a rack.

    Eat as soon as you can without burning your mouth or wait till cool if you have patience.

    Enjoy!