Saturday, September 3, 2011

Ruffles and Roses.

So I know I haven't posted for a few weeks... what can I say but, life gets busy and time gets away. So anyway today for something fun I decided to practice piping with Buttercream. I have seen these lovely ruffle cakes and they are just so beautiful... how hard could it be!?!


Not too hard it turns out! This was my first attempt and I just love the real life version as much as the photos I have seen. I did decide to keep it plain on the outside... but couldn't resist a bit of fun on the inside...


I followed this tutorial on YouTube and found it was the easiest to follow  http://www.youtube.com/watch?v=MHYX0qXDVy0 

Next I decided to try out buttercream roses on cupcakes! These also were fairly easy after a bit of practice. I did watch a few different videos weeks ago and adapted the technique for me being a lefty and all. The cakes look lovely, not perfect... but you have to start somewhere right??


This is my favourite one... colourful cake with buttercream rose and a light sprinkling of colour!


Anyway hope you enjoyed reading this edition as much as my kids enjoyed eating my creations.

Saturday, August 6, 2011

Red Velvet Cupcakes


I have been wanting to try these for awhile now and I am so pleased I did! They are really simple to make and very yummy!

Ingredients

300g (2 cups) plain flour
30g (1/4 cup) cocoa powder
1 tsp bicarbonate of soda
315g (1 1/2 cups) caster sugar

250ml (1 cup) buttermilk
200g unsalted butter, melted
2 eggs, lightly whisked
1 tbs white vinegar
1 tsp vanilla extract
1-2 tsp red food colouring


Preheat oven to 170°C.
Sift flour, cocoa powder and bicarbonate of soda into a bowl. Stir through the sugar.
Whisk the buttermilk, butter, eggs, vinegar and vanilla in a large jug until combined. Make a well in the centre of the flour mixture. Add the buttermilk mixture. Stir until just combined. Stir in the food colouring.

Divide the mixture among the lined pans. Bake for 20-25 minutes or until a skewer inserted into the centres comes out clean. Transfer to a wire rack to cool completely. Makes about 18 muffin size cupcakes.


Ingredients for Icing...

250g pkt cream cheese, at room temperature
150g (1 cup) pure icing sugar
60g butter, at room temperature
1 tsp vanilla essence


Use an electric beater to beat the cream cheese, icing sugar,  butter, and vanilla until smooth.


I made Red chocolate hearts but you could use 2 Red JellyBelly lollies to make a heart, or decorate however you like, but above all, share them with someone you love!

Saturday, July 30, 2011

Cheesecake Muffins


One recipe that makes (depending on what extras you add) ...Strawberry Cheesecake Muffins, Lemon Cheesecake Muffins, Raspberry & White Chocolate Cheesecake Muffins... Whatever flavour you can think up! Now you know why this is my most favourite Muffin recipe!


For the Muffin mix you will need...
125g unsalted butter, softened
250g cream cheese
330g caster sugar
4 eggs
1 tsp vanilla extract
300g self-raising flour, sifted
1 punnet of sliced strawberries, or zest of one lemon, or choc chips, Blueberries, Raspberries, jersey caramels, bananas, pie apple... use your imagination! 

Preheat the oven to 180c and line muffin pan with paper cases.

Place the butter, cream cheese and caster sugar in a bowl and beat with electric beaters until pale. Add eggs one at a time beating after each addition. Add the vanilla and then fold in the sifted flour. At this point mix in whatever flavourings you want being careful not to over mix.


Spoon into muffin cases and bake in the oven 20-30 mins or until golden. Cool before serving with cheesecake cream!
And for the cheesecake cream you will need:
    150g cream cheese
    1/3 cup icing sugar, sifted
    1/2 cup thickened cream
    1/2 tsp vanilla extract

    Strawberry and White Chocolate Cheesecake Muffin
    Strawberry Cheesecake Muffin
    Lemon Cheesecake Muffin


    Place all ingredients into a bowl and beat until thick and creamy! Refridgerate until ready to serve. Decorate as desired!


    Wednesday, July 20, 2011

    Super Mario Birthday Party!

    Well I have been home sick for a few days and today I finally have the energy to sit up and eat something. So to starve off the boredom I started looking at some awesome sites, one dedicated solely to partys. www.savethedate4cupcakes.com is an absolutely mind blowing website. I spent a good hour looking back through all the posts and my mind is spinning with ideas and possibilities for my daughters 3rd birthday... just for starters, LOL.
    Anyway my sons last birthday was his 6th and for a theme we decided on Super Mario. At first I wasn't so sure I could pull it off but once I started thinking about it, it became quite hard to stop! So this blog is dedicated to my Son's Mario Party!!


    Colourful Vanilla Cupcakes with homemade Mario flags and cupcake stand!


    Followed by homemade Mushroom cake pops!


    And homemade iced yellow stars...


    Now a picture of the food... mostly American/Italian style foods like pizzas, mini hotdogs, cheezles and gold coins to suit the Mario theme!


    Then the games comprised of good ole fashioned games such as ....
    Yoshi's Apple Bobbing!


    And a homemade "Pin the Nose" on Mario... (amazing what you can do with a A3 printer and some basic computer knowledge!)


    Of course we can't forget the cute pin the nose on the kids Photos...

    This turned into quite a good game on it's own!!
    And finally the send off is not complete without the very cool Mario Thank you bags!!!


    We really had such a great day and perhaps I set the bar a little too high in terms of future parties, but I just love a decent birthday bash. It is something my mother passed onto both my Sister and I... the knack of throwing a party with all the bells and whistles and a great cake to boot!

    Anyway I hope you have enjoyed this edition to my blog and perhaps have even been inspired!


    Saturday, July 16, 2011

    Sticky Date Pudding!


    So this weekend was beautifully cold and rainy... the perfect setting for some baking! Only problem is that my oven is broken! Yep, the heating element chose to die right before the weekend. But I am not to be stopped so I googled "baking without an oven" and researched until I came across a post about using my sunbeam electric frypan to cook cakes. Now this I had to try! Place a rack inside to elevate the cake and close the lid. As simple as that!


    So the following recipe can of course be baked in an oven but if you are without an oven you have to give this a go!
    Ingredients
    2 pears cored and sliced
    1 cup of pitted Dates
    1 1/4 cups of water
    1 tsp of bi-carb soda
    60g of butter cubed
    1 cup of tightly packed brown sugar
    2 eggs
    1 1/2 cups of SR Flour
    1 tsp of vanilla extract

    Place dates, water and bi-carb into a saucepan and bring to the boil. Boil for 5 mins. Then mash up with a fork.
    Stir in chopped butter and mix until it is melted.
    Stir in eggs, brown sugar and vanilla extract, then fold in flour til just combined
    Arrange Pears in the bottom of a greased lined spring-form cake pan. Pour batter on top.
    Place in electric frypan on number 8 for 50 mins or until cake is firm.
    Alternatively place in working oven at 180c for 35-40 mins.

    Stand in pan for 10mins to cool slightly before turning out!


    Now for the Sauce...

    1/2 cup of water
    2 cups of sugar
    2 cups of cream

    Place water and sugar in saucepan and bring to the boil, boiling until it reaches a golden colour. About 8-10mins. Try hard not to stir... and keep watching as it changes quite fast and you don't want to burn it!!
    Take off the heat then pour in 2 cups of cream, stir till no lumps. Be careful as the sugar syrup is extremely hot and will bubble when the cream is added, so use a long handled spoon and large saucepan! 
    Refridgerate left over sauce.


    Perfect for a cold winter's day or after a walk/bike ride on a freezing afternoon with great friends!

    Who says you need an oven to bake!


    Friday, July 8, 2011

    Date and Walnut Rolls...in a can!


    I found this interesting recipe recently and just had to try it! I had never heard of a "Nut Roll tin" or thought about using Juice Cans for baking but the results are professional, delicious and so simple to create.
    In my quest to find the correct tins I ended up buying two 850ml tins of Apricot nectar... which I froze the contents for making Apricot Chicken at a later date. Using a tin opener that cuts below the tin lip (magican or tupperware can opener) I opened the tins and emptied them. I then washed and dried the tins, before spraying them with oil and lining them with baking paper.


    The recipe Ingredients

    60grams of butter
    1 cup of boiling water
    1 cup of finely chopped dates
    1/2 teaspoon of bi-carb soda
    1 cup of firmly packed brown sugar
    2 cups of SR Flour
    1/2 cup of walnuts roughly chopped
    1 egg lightly beaten

    Pre-heat oven to 180c
    In a medium saucepan combine water and butter and cook stirring until butter melts. Take off heat. Add Dates and bi-carb and stir to combine. Then stir in sugar, SR Flour, egg and walnuts until combined.
    Spoon mixture into tins, should be just over half filled in each Can. Replace lid of can and place on a lined tray in the oven (the lining will catch the glue if it melts from the outside of tin).
    Bake for about 45 mins in fan forced oven or until a skewer comes out clean.
    Leave to cool for 5 mins in tin, then take the lid off and tip out your rolls.


    At this point I was holding my breath hoping this worked... and it did! And the taste was absolutely lovely. The whole family loved it! And they look like they could grace the pages of a cookbook!


    Don't you agree???

    Enjoy!

    Monday, July 4, 2011

    Bounty Cake


    This is a very simple cake that is reminicent of a Chocolate Bounty.

    Ingredients for cake

    1 cup of coconut
    1 cup of milk
    1 cup of SR Flour
    1 cup of white sugar

    Mix together, then pour into a greased cake or muffin pan.
    180c for 35 mins or 15 mins for muffins
    Should be able to pop a skewer into it and it should come out clean.
    Leave in pan to cool slightly then turn onto wire rack to cool completely.

    Ganache

    1/3 cup of cream
    180grams of Milk Chocolate

    Combine in microwave safe dish. Melt on high for about 1 min or until smooth, stirring every 30 seconds. Place in fridge until it has reached the right consistancy. Spread onto cake and enjoy!


    Choc Brownie Bites


    Felt like something quick and easy so baked these little beauties! Ready to eat in no time.

    Ingredients
    150g butter, chopped
    100g of milk choc
    100g of Dark choc
    Extra choc squares or chips
    1/2 cup of caster sugar
    1 cup of plain flour
    2 eggs lightly beaten

    Preheat oven to 180c
    Lightly grease muffin pan. Doesn't matter what size you use just adjust the time accordingly. I used patty case size pans.
    Place butter, milk and dark choc in saucepan over a medium-low heat. Cook, stirring, until melted and smooth. Stir in sugar.
    Take off heat and set aside for 5 mins to cool slightly.
    Whisk in flour and eggs. Spoon mixture into pan and either sprinkle with choc chips or place a square of choc onto each cake pushing in slightly. You could use up left over mini eggs including the caramel ones.
    Bake for 12- 15 mins or until top is firm.
    Cool slightly in pan before turning out to cool on a rack.

    Eat as soon as you can without burning your mouth or wait till cool if you have patience.

    Enjoy!

    Saturday, June 25, 2011

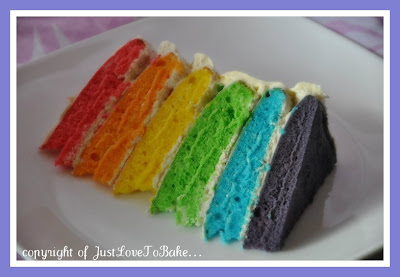
    Rainbow Layer Cake

    Rainbow you say? It looks so elegant and white...Keep reading!


    Hi All, Sorry about the lack of updates... hopefully this my latest blog will make up for it! I have been working, studying and am also a mum and wife and as you can imagine this doesn't leave much time for me to do the thing I enjoy the most... baking! So today was about me... Baking this cake was about unleashing my creative side! I got the idea from a gorgeous friend of mine who actually used her version as a cake smash photo shoot for her one year old baby girl! I saw the cake she made and just had to try it.

    So for lack of ample time I did actually cheat and use cheap cake mix. You see this cake has 6 layers and all that baking takes up alot of time. But the results speak for themselves!


    It is such a pretty cake when cut! I obviously went wild with the colours of each layer and have sandwiched the layers together with a Raspberry jam cream and covered the cake in a delicious buttercream.

    Raspberry Jam Cream

    600ml of thickened cream
    2 tablespoons of icing sugar
    1 tablespoon of Raspberry Jam

    Place in a mixer and mix till thick.

    Buttercream

    250g butter, cubed, at room temperature
    450g (3 cups) pure icing sugar, sifted
    60ml (1/4 cup) milk

    Place the butter in a large mixing bowl. Use an electric beater to beat until light and fluffy.
    Gradually add the icing sugar and beat until the mixture is very pale and fluffy. Gradually add the milk and beat until smooth and well combined.


    Enjoy! My pot of gold at the end of this rainbow was my six year old son exclaiming,
     "Mum it is so colourful... you are so clever"
    Then clapping!

    Sunday, May 8, 2011

    Marshmallow topped Caramel Slice

    For Mothers Day today I recieved a revised edition of my favourite cook book "Day to Day Cookery" from my husband and kids. I have always loved this book and the new edition was definately not a let down. After an extensive session of pouring thru the pages I decided to try the marshmallow caramel slice. Due to copyright I am unable to actually share the recipe on this blog. I was just so proud of the results I had to show some pictures.
    The base is a combination of flours, brown sugar, coconut and melted butter. This is then baked. Instead of using the caramel recipe provided I just used a can of nestles caramel top n fill. I did however make the marshmallow from scratch.
    It was quite simply 1 cup of water, 1 cup of sugar and a tablespoon of gelatine mixed together over a low temp at a light simmer for 5 mins.
    I then poured it into a bowl to cool before beating it for about 8 mins until thick and fluffy.

    At this point you just need to spread it onto the biscuit with caramel layer base. I sprinkled the marshmallow with choc sprinkles but you could use coconut instead. Place in the fridge until cooled and set. 
    And lastly make sure that your little helper (if you have one) gets an oppourtunity to lick the beater!

    It is after all the essence of good times in a childs world!

     The result is a delicious slice with a light fluffy marshmallow topping. Just perfect for a sweet tooth.
    Happy Mother's day to all you beautiful Mothers out there. Hope your day was as full of joy as mine has been.